Grab My Blinkie

I CT For


Showing posts with label ptu tube free kit. Show all posts
Showing posts with label ptu tube free kit. Show all posts
Friday, July 11, 2014
Matthews Many Faces of Beauty

supplies needed:
paint shop pro
font Young and beautiful you can find it at dafont . com here
template 8 by Mizteeque you can get it here
Dees beautiful freebie Kerade kit you can get this here
mask 53 from here
Filters/Eye candy/gradient glow (optional)
6 tubes of choice from the same artist
I used the art of Amy Matthews which you can purchase and use with
license from CDO
_________________________________________________________
template 8 by Mizteeque you can get it here
Dees beautiful freebie Kerade kit you can get this here
mask 53 from here
Filters/Eye candy/gradient glow (optional)
6 tubes of choice from the same artist
I used the art of Amy Matthews which you can purchase and use with
license from CDO
_________________________________________________________
Ok lets get started, this is a very simple tutorial
open up mizteeques template in psp, we can resize later.
shit D to duplicate, close out original.
shit D to duplicate, close out original.
delete the cr layer. and x out the background layer for now or you can delete
it as well.
it as well.
x out all other layers besides the frame layer.
with your magic wand click inside each of the squares of the frame.
Selections/modify/expand by 12
pick your first tube and paste as a new layer, and repeat until all faces are
inside your frames, copy paper 1 as a new layer resize by 110 to make it bigger.
put under all your tube layers.
inside your frames, copy paper 1 as a new layer resize by 110 to make it bigger.
put under all your tube layers.
Selections/invert and hit delete on your keyboard
for all the tube layers and this paper layer. Selections/select none.
for all the tube layers and this paper layer. Selections/select none.
erase any part of your tubes that are in any of the other frame boxes that is
not suppose to be there.
not suppose to be there.
Select your frame layer Selections/select all/float/defloat
copy paper 6 as a new layer resize by 110 you may have to move to the left
just a little . Selections/invert hit delete on your keyboard.
copy paper 6 as a new layer resize by 110 you may have to move to the left
just a little . Selections/invert hit delete on your keyboard.
Delete original frame layer.
now back on the layer palette un x the word art the doodles and the flower layers.
copy and paste your flower from the kit i used the first one there are two to choice
from. paste as a new layer on your tag , duplicate 2 times for a total of 3 flowers,
place over flowers in the template. add a drop shadow V&H=2 opacity 45 blur 5
color black. do this for all the flowers.
copy and paste your flower from the kit i used the first one there are two to choice
from. paste as a new layer on your tag , duplicate 2 times for a total of 3 flowers,
place over flowers in the template. add a drop shadow V&H=2 opacity 45 blur 5
color black. do this for all the flowers.
you can delete original flower layer.
go to your doodle layer, Selections/select all/float/defloat and paste paper 6
as a new layer. resize by 115 this time. Selections/invert hit delete on keyboard.
select none. and delete original layer. Adjust/add noise uniform checked
noise 50 ,monochrome checked, add same drop shadow as before.
delete original layer. add same drop shadow as before.
as a new layer. resize by 115 this time. Selections/invert hit delete on keyboard.
select none. and delete original layer. Adjust/add noise uniform checked
noise 50 ,monochrome checked, add same drop shadow as before.
delete original layer. add same drop shadow as before.
go to your word art layer, paste paper 8 as a new layer,Selections/invert and
delete on your keyboard. delete original layer.
delete on your keyboard. delete original layer.
on your new word art layer, go to Adjust/add & remove noise same settings as
before. go to effects/inner bevel and add these settings to the word art
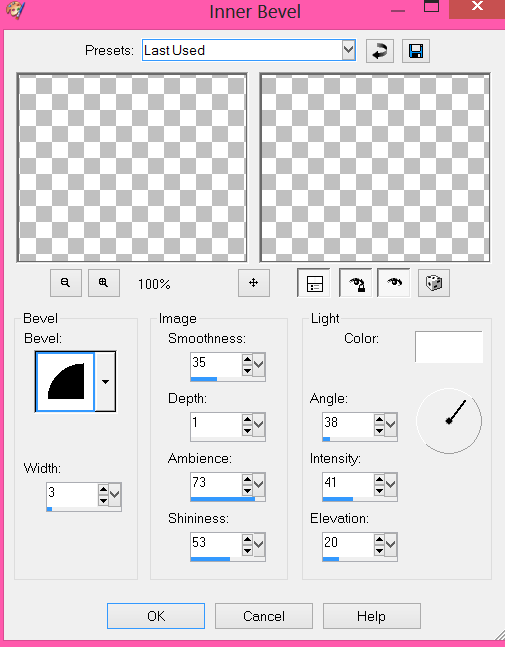
add drop shadow 2/2/45/5 color #035e5b
copy paper 7 as a new layer bring it to the very bottom resize by 125
apply your mask. I moved my mask a little to the left.
apply your mask. I moved my mask a little to the left.
you can now add the butterflies from the kit (see my tag)
and your copyright info to your tag.
and your copyright info to your tag.
for the name type it out with color #15665d add the same noise
as before, and with the same gradient glow we did on the word art.
image/rotate free rotate 7 to the left and place on left side of tag.
as before, and with the same gradient glow we did on the word art.
image/rotate free rotate 7 to the left and place on left side of tag.
merge all your layers together, i dont merge with my name because i want to
add more names later.
add more names later.
once this is done if you havent resized already, I always go to canvas size
resize by the size i want my tag , this time i went 655x655 and image resize
and resize my tag by 70%, all layers unchecked.
resize by the size i want my tag , this time i went 655x655 and image resize
and resize my tag by 70%, all layers unchecked.
your all finished now !! you can save your tag.
Sunday, January 19, 2014
Love Struck (2 piece forum set)
tutorial written on Jan 1st, 2014 by LadyQueen


Supplies needed
psp 9
forum template 5 by Leah HERE
Lovely embrace scrapkit Acreativespacebetween
New lovely ptu tube by Bit's N' Bobs you can purchase here at Picsfordesign
font/fonts of choice
forum template 5 by Leah HERE
Lovely embrace scrapkit Acreativespacebetween
New lovely ptu tube by Bit's N' Bobs you can purchase here at Picsfordesign
font/fonts of choice
Simone animation 199/purple if your going to animate
get it here at Scrappy Bit of Fun
animation shop.
animation shop.
Ok lets get started.
open your banner template
delete cr layer and the splatter layer.
delete cr layer and the splatter layer.
on you bg layer selection/select all/float/defloat
copy and paste paper 2 as a new layer
add a new layer flood fill with #ae0000
selections/invert hit delete on your keyboard but make sure your
on the paper layer. Selection/select none.
on the flood fill layer change the blend mode to luminance (legacy)
copy and paste element 38 as a new layer resize by 70% twice
duplicate/mirror. and on your flood fill layer.selections/select all/float/defloat
Selections/invert hit delete on both heart layers. Selections/select none.
duplicate/mirror. and on your flood fill layer.selections/select all/float/defloat
Selections/invert hit delete on both heart layers. Selections/select none.
border 1 Selections/select all/float/defloat and flood fill with the same color
#ae0000, delete original.
#ae0000, delete original.
border 2 Selections/select all/float/defloat copy and paste any one of
the white papers as a new layer,Selections/invert hit delete on your keyboard
deselect.
delete original
Select the rec 2 layer, copy and paste paper 1 as a new layer
selections/invert hit delete on your keyboard, delete original.
selections/invert hit delete on your keyboard, delete original.
circle 2 , selections/select all/float/defloat add a new layer and flood
fill with the red color from before #ae0000 delete original
Effects/texture effects/blinds width 3, opacity 30 color blk
horizontal and lift from left/top checked.
fill with the red color from before #ae0000 delete original
Effects/texture effects/blinds width 3, opacity 30 color blk
horizontal and lift from left/top checked.
on rec 1 selections/select all/float/defloat add a new layer and flood
fill with #dc1919. selections/select none. delete original layer.
fill with #dc1919. selections/select none. delete original layer.
on your dotted rectangle layer, Selections/select all/float/defloat
copy and paste a red paper of choice, Selections/invert hit delete
on your keyboard. Selections/select none. delete original layer.
copy and paste a red paper of choice, Selections/invert hit delete
on your keyboard. Selections/select none. delete original layer.
copy and paste your tube as a new layer resize by 70% move to the left.
move under all your border layers.
move under all your border layers.
select circle 1 Select all/float/defloat flood fill with #dc1919
select none, delete original. add a blk gradient glow to this layer
or just a drop shadow of your choice.
select none, delete original. add a blk gradient glow to this layer
or just a drop shadow of your choice.
copy and paste element 42 as a new layer place over this circle
(see my tag for placement)
(see my tag for placement)
with your text tool font Valentine In Love type out struck by love
over your rec layer. (see my tag)
over your rec layer. (see my tag)
ok now at this time you need to add your cr info to your tag
and your name i used AlexBrush. and added a glow to it.
and your name i used AlexBrush. and added a glow to it.
you can save your tag as it is now or you can continue to follow this
tutorial and animate.
tutorial and animate.
for the animation you need to open animation shop
find your animation open it up
Edit/select all File/export frame to psp
this will bring it up in paint shop pro
starting from frame 1 make sure its selected in the layer palette
go to adjust/hue and saturation
hue:255 Saturation 248 hit ok.
find your animation open it up
Edit/select all File/export frame to psp
this will bring it up in paint shop pro
starting from frame 1 make sure its selected in the layer palette
go to adjust/hue and saturation
hue:255 Saturation 248 hit ok.
do this for all 11 layers.
at this point go to your tag and x out your name , the element and
cr if its over the circle layer.
cr if its over the circle layer.
select your circle .Selections/select all/float/
defloat. Selections/modify contract by 3 if you added a gradient glow
before like i did.if not just select the circle.
defloat. Selections/modify contract by 3 if you added a gradient glow
before like i did.if not just select the circle.
go back to your animation in psp starting from frame 1 copy and
paste on your banner as a new layer, dont move anything just leave it there.
do this for all 11 layers.
paste on your banner as a new layer, dont move anything just leave it there.
do this for all 11 layers.
you can name your layers if this helps.
when you are finished, go to selections/invert and hit delete on each of
the heart layers you just added.
the heart layers you just added.
Selections/select none.
ok un x the layers you x'ed out before, make sure layer 1 of
your animation in psp is un x'ed (i renamed mine heart 1-11)
copy merges on your tag
your animation in psp is un x'ed (i renamed mine heart 1-11)
copy merges on your tag
take to animation shop paste as a new layer
go back to psp x out your heart layer 1 and un x layer 2
copy merged and go over to animation shop , paste after current frame.
copy merged and go over to animation shop , paste after current frame.
keep doing this for all layers going from psp back to animation shop
paste after current frame each time, make sure in animation shop
you are on the last frame that your copied over there.
paste after current frame each time, make sure in animation shop
you are on the last frame that your copied over there.
when your finished view your animation and if your happy with it
save your tag
save your tag
keep animation open so you can use on your avatar
___________________________________________________________
avatar
Love Struck avatar
use the same instructions as the banner except
for these few instructions here.
for these few instructions here.
on your background layer selections/select all/float/defloat
paste paper 2 as a new layer resize by 50% and then again by 60%
selections/invert hit delete on keyboad. Select none.
paste paper 2 as a new layer resize by 50% and then again by 60%
selections/invert hit delete on keyboad. Select none.
on the middle circle or cir1 select all flood fill with #dc1919
delete original. add gradient glow or drop shadow.
delete original. add gradient glow or drop shadow.
if your animating, select the middle circle
select all/float/defloat. resize the heart animation you already
have open in psp.
select all/float/defloat. resize the heart animation you already
have open in psp.
if you closed it out like i did and have to restart.
resize by 70% then again by 80%
or resize to preference.
repeat the same steps as in the banner animation.
add your name or initial and thats it.
i hope you enjoyed this tutorial .
Subscribe to:
Posts
(Atom)