About Me
Hello, This is Reina
I go by the name LadyQueen
psp is my hobby and passion, I love to create.
thanks for stopping by
CT Tags -Tuts and Snag Tags
This blog was originally for my tutorials..I have stopped writting tutorials for a while, but my old tuts are still here.. This is where i will share allmy CT tags and Snags that you are welcomed to save to yourcomputer and use them in your groups.Please do not rip apart and please do not claim as your own. Thank you
Monday, July 27, 2020
2:33 PM | Edit Post
Corona Virus / 2 piece forum set
I haven't wrote a tutorial in forever so I hope this will be
easy for you to follow and maybe a start to more tutorials to come
if anyone is interested after this lol.
Supplies needed for tutorial : Paint shop pro (i'm using psp9)
textures from deviant art HERE
Corona Font HERE (used for Corona Virus word art on tag)
Corona virus font HERE (its a ding font for the shapes)
and font of choice for your name I used Ravenna
tube of choice I used tube Corona Lady by Palitra_sveta at picsfordesign HERE
Animation package 8 from Designs by Kiya HERE
My supplies HERE: Included the shapes created with the ding font
and solar flare background created by me ( I made this with the flaming pear filter)
-------------------------------
Let's get started !
I always go ahead and open up my tube and textures in psp, also go ahead and open
your shapes and solar flare bg.
Open up a new 730x350 transparent image.
copy and paste nmb_texture_stock-20(13) and paste as
a new layer. Image/Mirror
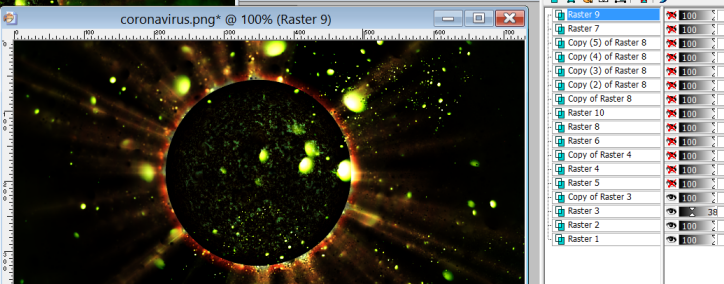
Copy and paste solar flare as a new layer. move up to middle of
canvas (see my finished tag for placement)
change the blend mode to overlay and drop the opacity to 38
Dupilicate this layer and put the opacity back to 100
(keep blend mode set on overlay on this layer as well)
copy and paste your tube as a new layer/resize to your liking
copy and paste my shape 2 as a new layer and position on
the left side of the tag/ Image/Mirror , leave some room on the sides and
the bottom for the border.
if you want to create the shape yourself , its the letter U
with the corona virus font. I used the textures from the tag
and added a gradient glow on it. Or you can choose something else
its up to you. (make it your own if you would like )
go back to layer 1, go to selections/select all
Modify/Contract by 7
Selections/invert
copy and paste nmb_texture_stock-20(06) as a new layer
Selections/invert hit delete on your keyboard.
add noise 85% to this layer
on this same layer go back to selections/select all
float/defloat , Selections/modify/contract by 1
New Layer and flood fill with black. Selections/select none.
Next copy and paste your germs LOL. of you can create your own
with the letter a , I used black and added a gradient glow.
you can duplicate and resize them, resize on the same layer.
and just add them how ever you want on the tag. or use another letter from
the font and add something else. use my finished tag as
an example.
now I used the font Corona to type out the word Corona Virus on
the tag you can do the same or type something else out.
for the avatar open up a new 180x180 transparent image
just copy your texture layer and the solar flare layer over from the banner
as a new layer, the blend modes will stay the same.
I resized the solar flare by 70% 2 times and moved to the middle.
then added the same border as before on the main tag.
Now you can add your credits and your name if you want
to finish here or you can keep following for the animated part.
If your still with me and want to do the animation.
Open up animation shop and open up KD-animations-29mng file
go back to psp and x out all layers except the texture layer and the
2 solar flare layers.
right click copy merged.
bring to animation shop , paste as a new animation.
right click on that frame and duplicate selected, for as many
frames as the animation. this one has 33.
Go to Edit/Select all , back up to Edit and make sure propogate
paste is selected.
go to KD-animation 29mng.
resize by 50 %
Edit/Select all. Edit Copy
go back to your tag , Edit/ Paste into selected frame
keep the mouse held down until you have your animation
where you want to place it on the tag, and let go.
repeat the steps to add more of smoke animation to the tag.
I repeated twice , then went and mirrored the animation
and added it again. here is a preview. but feel free to place
where you like.
Ok now we are going back to paint shop pro. x out the texture and solar layers.
open up all the other layers above.
right click on the top copy merged.
take this to animation shop and paste as a new animation
Edit/Copy and then paste into selected frames over your tag.
now your ready to save your tag. I usually save one as a mng file to
add names later to. and one I save as a gif
when saving as a gif use these settings.
Keep hitting next until all saved.
use these same exact steps when animating your avatar, the only thing you will change
is the size of the animation, maybe by another 50%
That's it !
If you try my tutorial I would love to see your finished results
you can post them on facebook for me or you can email them to me.
Thank you :)
This tutorial was written by me on July 27th, 2020, tags are created with my own imagination and any resemblance to any other tags or tutorials is purely coincidental.
If you have any questions , about my tutorials you can email me at lady21r@hotmail.com
Subscribe to:
Post Comments
(Atom)
Categories
- **CT Bella Caribena**
- Animated PTU tutorial
- Animation settings tutorial
- CT KZ Designz
- CT Kiya Designs
- CT Kloe and Elegancefly
- CT Savage Dezines
- CT for Katharine Art
- CT tutorials
- Ct Elegancefly and Savage Dezines
- Elegancefly
- PTU animated tutorials
- PTU kits
- PTU non animated
- Savage Dezines CT
- Snag tags
- Snags
- animated tutorials
- ptu tube free kit
Followers
Blog Archive
-
▼
2020
(111)
-
▼
July
(17)
- **CT for Kiya Designs**
- ..•.¸¸•´¯`•.¸¸.ஐ CT for Katharine art ஐ..•.¸¸•´¯`•...
- ..•.¸¸•´¯`•.¸¸.ஐ CT for Savage Dezines ஐ..•.¸¸•´¯`...
- **CT for Designs by Kiya ** Corona Virus ~ Animate...
- ..•.¸¸•´¯`•.¸¸.ஐ Elegance Fly and Savage Dezines ....
- ..•.¸¸•´¯`•.¸¸.ஐ CT for Katharine Art ஐ..•.¸¸•´¯`•...
- ..•.¸¸•´¯`•.¸¸.ஐ CT for Savage Dezines ஐ..•.¸¸•´¯`...
- ..•.¸¸•´¯`•.¸¸.ஐ CT for Kiya Designs and Pink Para...
- ..•.¸¸•´¯`•.¸¸.ஐ CT for Savage Dezines ஐ..•.¸¸•´¯`...
- ..•.¸¸•´¯`•.¸¸.ஐ CT for Elegancefly and Savage De...
- ..•.¸¸•´¯`•.¸¸.ஐ CT for Savage Dezines ஐ..•.¸¸•´¯`...
- ..•.¸¸•´¯`•.¸¸.ஐ CT for Katharine Art ஐ..•.¸¸•´¯`•...
- ..•.¸¸•´¯`•.¸¸.ஐ CT for Kiya Designs ..•.¸¸•´¯`•.¸¸.ஐ
- ..•.¸¸•´¯`•.¸¸.ஐ CT for Savage Dezines ஐ..•.¸¸•´¯`...
- ..•.¸¸•´¯`•.¸¸.ஐ CT for Kiya Designs and Pink Para...
- ..•.¸¸•´¯`•.¸¸.ஐ CT for Elegancefly and Savage De...
- ..•.¸¸•´¯`•.¸¸.ஐ CT for Katharine Art ஐ..•.¸¸•´¯`•...
-
▼
July
(17)


0 comments:
Post a Comment