Grab My Blinkie
I CT For


Showing posts with label animated tutorials. Show all posts
Showing posts with label animated tutorials. Show all posts
Saturday, September 6, 2014
Deadly Desire
tutorial written on Sept 5th 2014
tutorial written on Sept 5th 2014

supplies needed :
psp 9 and animation shop 3 (optional very easy animation)
good working knowledge of both the programs
Dark souls scrapkit by Scrappin with lil ole me
you can purchase her awesome dark kit here.
tube of choice or you can use the one im suppling by free to use artist
Anna Ignatieva
word art not sure who the creator of this is if you know or its you
please let me know so i can credit the person.
My Supplies
Missy template 378 download here
Simone Animation 419 you can download on here blog here.
font of choice, i used my bloody valentine download here
Filter: eye candy 4000 gradient glow
Missy template 378 download here
Simone Animation 419 you can download on here blog here.
font of choice, i used my bloody valentine download here
Filter: eye candy 4000 gradient glow
ok lets get started shall we ?
Open up your template in psp
shift D to duplicate.
shift D to duplicate.
Image/resize canvas by 750, we can resize later.
delete the copyright , both heart layers, the light rectangle,dotted square
circle 1 and 2.
circle 1 and 2.
ok select square copy paper 22 as a new layer, resize by 70%
paste your tube as a new layer, move her over to the left a little if you
want to like i did because her finger is kinda chopped off lol.
duplicate the tube layer. selections/invert hit delete on the original tube
layer and on the paper layer. select none.
use your selection tool to delete the parts of the tube that are hanging over
the square.
___________________________________________
select square 1, paster paper 22 again , resize by 70% , invert and hit
delete. repeat the steps for square 2 , 3 and 4.
delete all orignal layers.
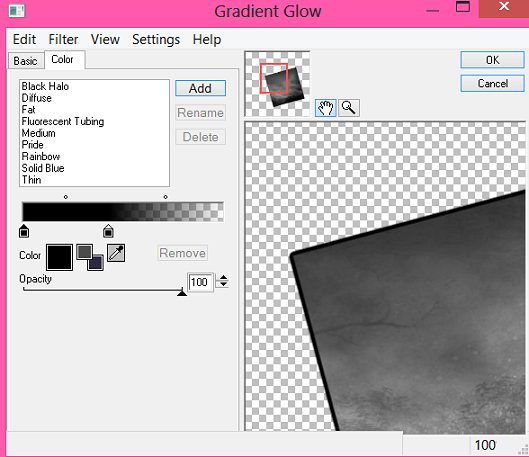
add a black gradient glow ,glow width 3/soft corners 25/opacity 100
move slidder over like this in preview.
____________________________________________
select your thin rectangle and paste paper 12 as a new layer place how
ever you want it. delete original layer.
________________________________________________
paste element 15 (the moon) resize by 30 % place to the right
and place behind all layers except the last square layer on the bottom.
element 126 resize by 70%, rotate to the left by 5 %, move under your tube layer
and that square layer, (see my tag) Duplicate, mirror and flip move over
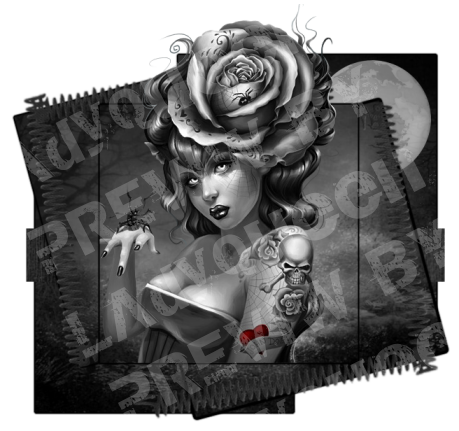
to the right a little. this is what you should have.
_______________________________________________
element 19 resize by 70% move to the right under your tube layer
duplicate and mirror.
element 95 resize by 70% move to the left and place below your tube layer
duplicate, mirror and place to the bottom right.
________________________________________
element 18 resize by 70% move to the left of the tag, under the above layer.
element 3 resize by 30% and place to the left of the tag.
element 12 resize by 30% place beside above layer.
element 87 rotate to the left by 90 degrees and place behind your flower.
element 2 resize by 70% place under these layers.
add your deadly desire word art as a new layer. see my tag for placement.
______________________________
after adding all your elements add more if you like. merge all layers.
if your going to animate this tag, add a white gradient glow to your
merged tag. ( I think when doing a blk tag its best to use the glow)
paste your tube as a new layer, move her over to the left a little if you
want to like i did because her finger is kinda chopped off lol.
duplicate the tube layer. selections/invert hit delete on the original tube
layer and on the paper layer. select none.
use your selection tool to delete the parts of the tube that are hanging over
the square.
___________________________________________
select square 1, paster paper 22 again , resize by 70% , invert and hit
delete. repeat the steps for square 2 , 3 and 4.
delete all orignal layers.
add a black gradient glow ,glow width 3/soft corners 25/opacity 100
move slidder over like this in preview.
____________________________________________
select your thin rectangle and paste paper 12 as a new layer place how
ever you want it. delete original layer.
________________________________________________
paste element 15 (the moon) resize by 30 % place to the right
and place behind all layers except the last square layer on the bottom.
element 126 resize by 70%, rotate to the left by 5 %, move under your tube layer
and that square layer, (see my tag) Duplicate, mirror and flip move over
to the right a little. this is what you should have.
_______________________________________________
element 19 resize by 70% move to the right under your tube layer
duplicate and mirror.
element 95 resize by 70% move to the left and place below your tube layer
duplicate, mirror and place to the bottom right.
________________________________________
element 18 resize by 70% move to the left of the tag, under the above layer.
element 3 resize by 30% and place to the left of the tag.
element 12 resize by 30% place beside above layer.
element 87 rotate to the left by 90 degrees and place behind your flower.
element 2 resize by 70% place under these layers.
add your deadly desire word art as a new layer. see my tag for placement.
______________________________
after adding all your elements add more if you like. merge all layers.
if your going to animate this tag, add a white gradient glow to your
merged tag. ( I think when doing a blk tag its best to use the glow)
add your copyright info and your name to the tag.
resize by 90% change canvas size to 700x700 and just crop as close
as you can get without cutting the tag off.
resize by 90% change canvas size to 700x700 and just crop as close
as you can get without cutting the tag off.
Ok time to animate.
Go over to animation shop
open up Simone animation 419 edit/select all and resize by 60%
go back to psp copy merged on your tag, copy
and paste as a new layer in animation shop.
Go over to animation shop
open up Simone animation 419 edit/select all and resize by 60%
go back to psp copy merged on your tag, copy
and paste as a new layer in animation shop.
Duplicate the tag for as many frames as we have in the animation. for this one
we have 21.
we have 21.
edit/propagate paste checked,
on your tag edit/select all
select all on the animation
right click on your tag
edit/paste/into selected frame.
place right over the little potion bottle.
view your animation and if your happy with your results save.
on your tag edit/select all
select all on the animation
right click on your tag
edit/paste/into selected frame.
place right over the little potion bottle.
view your animation and if your happy with your results save.
I hope you enjoyed this tutorial.
Monday, June 24, 2013
Proud Canadian


Tutorial written by Lq on 6/25/13
Supplies needed
psp 9 and animation shop
tube of choice I used the art of Elias Chatzoudis
you can find his tubes HERE
Canada scrapkit from Monti playground here
font of choice
eye candy 4000/swirl
ok lets get started
open a new 650x250 transparent image
go to your selection tool rectangle and start from the side of your tag draw
out your selection to 200 (you will see the ruler if you go to view/rulers)
dont worry if you can't get all the way to the edge. go to selections/modify/expand by 3
copy and paste paper 5 as a new layer. selections/invert and hit delete on the keyboard
selections/select none.

in your layer palette right click on this layer duplicate , image/mirror
merge these two layers together and name it border or something in your layer palette.
copy and paste your Canada flag as a new layer and bring under your paper layers.
resize by 80%. rename this layer to flag.
on layer 1 your bg layer flood fill with a color from the flag so that it blends in i used #f4f4f4
copy and paste your bead element to the tag. resize by 60 % image/rotate/free rotate
90degrees. duplicate and mirror. copy and paste your tube as a new layer ..type out a
saying or Proud Canadian like i did, add elements or whatever else you like to your tag.
don't forget your cr info on your tag.
x out the bg layer ,border and flag layer. merge visible all these layers.
un x the layers you x'ed out. you should now only have a merged layer a border layer
a flag layer and a bg Layer.
duplicate your flag layer twice for a total of 3 layers..and also duplicate your border
layer twice for a total of 3 layers. you can rename these flag 1, flag 2, flag 3.
border 1, 2 and 3 this is how your layer palette shoud look

ok now go back to your flag layer 1 and with your magic wand tolderance 21/feather 1
click inside the leaf. go to effects eye candy 4000 with these settings.

go up to flag 2 and add your swirl filter but this time hit random seed.
do the same thing to flag 3. selections/select none.
go to your border layer 1 selections/select all selections float/defloat.
go to effects/plugins/eye candy 4000 swirl with the same settings as before
just hit random seed on each layer.
selections/select none.
Ok time to animate.
X out border 2 and 3 and X out Flag 2 and 3 and on your layer palette,click inside one of the layers
not x'ed out. right click copy merged.
go over to animation shop. right click paste as a new layer.
go back to psp x out flag and border layer 1. un x flag and border layer 2 copy merged
go over to animation shop and on the animation already there right click inside there paste after
current frame.
back to psp x out flag and border 2 and open up flag and border 3
go back to animation shop and on the second frame right click ,paste after current frame.
view animation and if your happy with your results you can save your tag.
for the avatar open a 150x150 transparent image..flood fill with the color from before
selections/select all copy and paste your flag as a new layer..resize by 50% selections/
invert and hit delete on the keyboard. click inside the leaf , duplicate your layers add
the plugin just like you did for the tag.
Hope this tutorial was easy enough and hope you had fun with it.would love to see what
you come up with :)
Tutorial written by Lq on 6/25/13
Supplies needed
psp 9 and animation shop
tube of choice I used the art of Elias Chatzoudis
you can find his tubes HERE
Canada scrapkit from Monti playground here
font of choice
eye candy 4000/swirl
ok lets get started
open a new 650x250 transparent image
go to your selection tool rectangle and start from the side of your tag draw
out your selection to 200 (you will see the ruler if you go to view/rulers)
dont worry if you can't get all the way to the edge. go to selections/modify/expand by 3
copy and paste paper 5 as a new layer. selections/invert and hit delete on the keyboard
selections/select none.
in your layer palette right click on this layer duplicate , image/mirror
merge these two layers together and name it border or something in your layer palette.
copy and paste your Canada flag as a new layer and bring under your paper layers.
resize by 80%. rename this layer to flag.
on layer 1 your bg layer flood fill with a color from the flag so that it blends in i used #f4f4f4
copy and paste your bead element to the tag. resize by 60 % image/rotate/free rotate
90degrees. duplicate and mirror. copy and paste your tube as a new layer ..type out a
saying or Proud Canadian like i did, add elements or whatever else you like to your tag.
don't forget your cr info on your tag.
x out the bg layer ,border and flag layer. merge visible all these layers.
un x the layers you x'ed out. you should now only have a merged layer a border layer
a flag layer and a bg Layer.
duplicate your flag layer twice for a total of 3 layers..and also duplicate your border
layer twice for a total of 3 layers. you can rename these flag 1, flag 2, flag 3.
border 1, 2 and 3 this is how your layer palette shoud look
ok now go back to your flag layer 1 and with your magic wand tolderance 21/feather 1
click inside the leaf. go to effects eye candy 4000 with these settings.
go up to flag 2 and add your swirl filter but this time hit random seed.
do the same thing to flag 3. selections/select none.
go to your border layer 1 selections/select all selections float/defloat.
go to effects/plugins/eye candy 4000 swirl with the same settings as before
just hit random seed on each layer.
selections/select none.
Ok time to animate.
X out border 2 and 3 and X out Flag 2 and 3 and on your layer palette,click inside one of the layers
not x'ed out. right click copy merged.
go over to animation shop. right click paste as a new layer.
go back to psp x out flag and border layer 1. un x flag and border layer 2 copy merged
go over to animation shop and on the animation already there right click inside there paste after
current frame.
back to psp x out flag and border 2 and open up flag and border 3
go back to animation shop and on the second frame right click ,paste after current frame.
view animation and if your happy with your results you can save your tag.
for the avatar open a 150x150 transparent image..flood fill with the color from before
selections/select all copy and paste your flag as a new layer..resize by 50% selections/
invert and hit delete on the keyboard. click inside the leaf , duplicate your layers add
the plugin just like you did for the tag.
Hope this tutorial was easy enough and hope you had fun with it.would love to see what
you come up with :)
Monday, June 10, 2013
My first tutorial since being back online and opening my new blog :)
Sea Magic 6/10/13
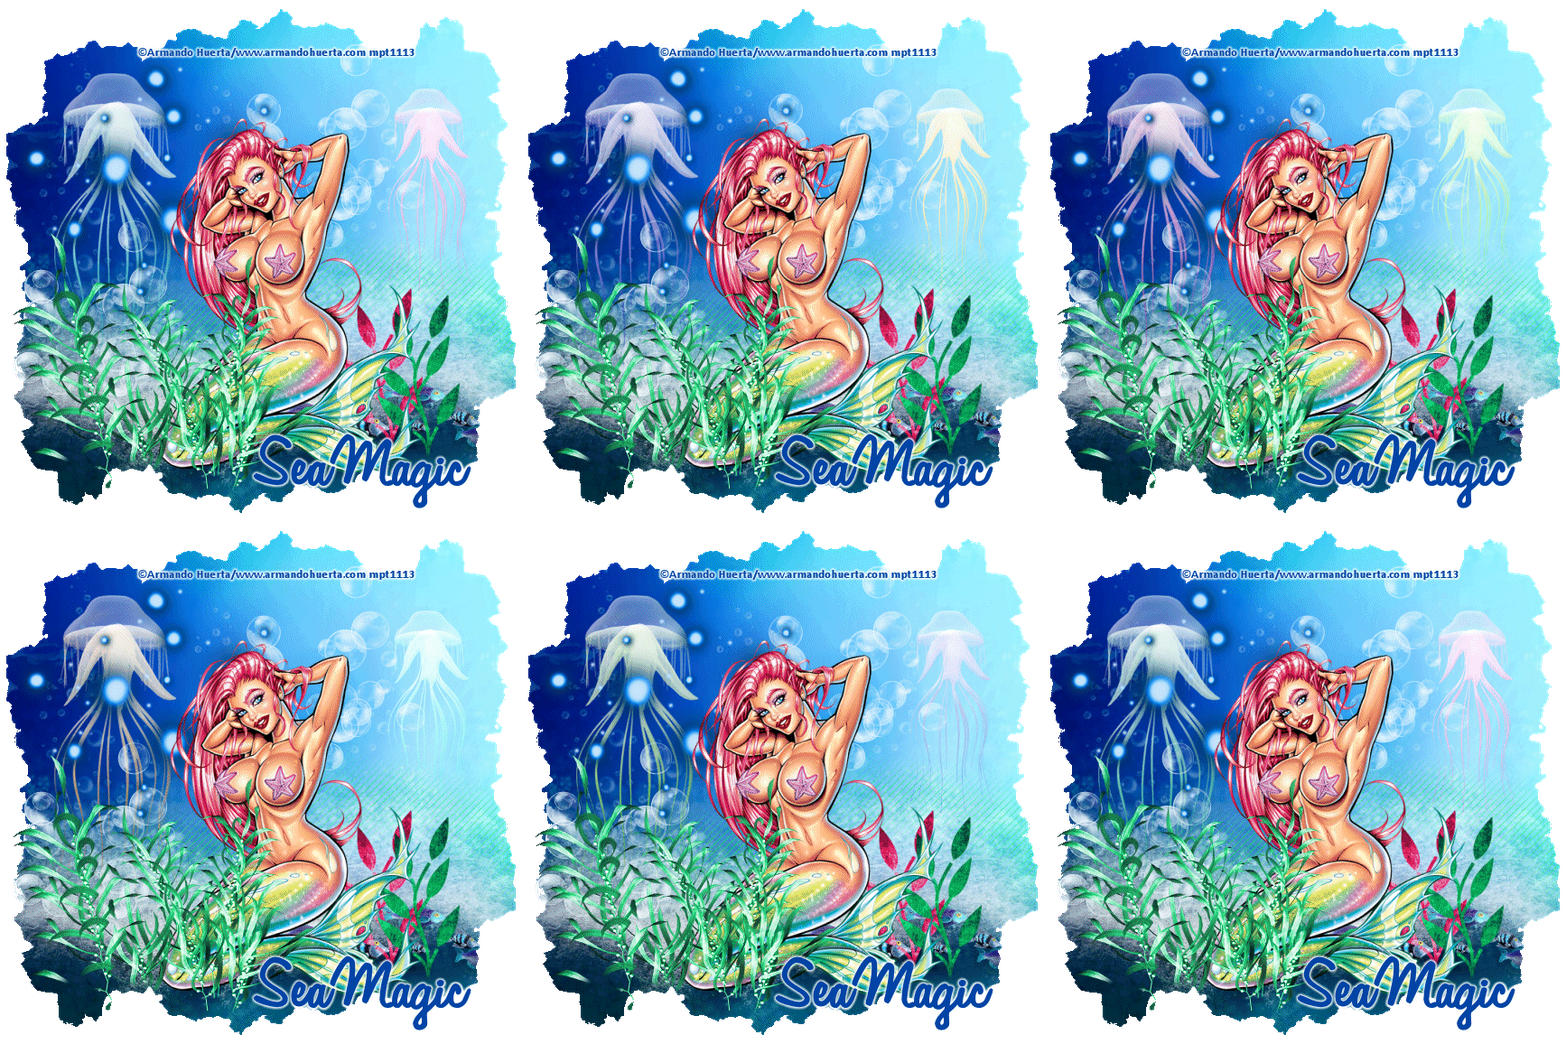
for this tutorial you will need
paint shop pro 9 but any version should work
animation shop (click on tag for larger image)
paint shop pro 9 but any version should work
animation shop (click on tag for larger image)
tube of choice (i'm using the artwork of Armando Huerta)
mask 363 from http://weescotslasscreations.blogspot.com/
scrapkit Magic Sea by Bibi Like her Facebook page to get the kit for free
https://www.facebook.com/BibisCollectionDigitalScrapKits
mask 363 from http://weescotslasscreations.blogspot.com/
scrapkit Magic Sea by Bibi Like her Facebook page to get the kit for free
https://www.facebook.com/BibisCollectionDigitalScrapKits
font I used is called Oceans11
open up 600x600 transparent image
copy and paste paper 10 as a new layer
open up WSL mask 363
layers/new mask from image, find the mask in the drop down box
source luminance checked hit ok
on your layer palette right click on the mask layer hit delete
hit yet. on the layer right above (not the group layer) right click merge group.
add your elements use the ones i used in my tag if you want to or use your own.
see tag for placement. go ahead and add your cr info on the tag make it the top layer.
(NOTE: if you want to add your name now go ahead I like to wait until i do the
whole tag in animation shop incase i want to add my friends names to my tag at the end)
k now for the animation
in psp x out the bg layer and your mask layer
merge all the other layers together.
in psp x out the bg layer and your mask layer
merge all the other layers together.
go to animation shop copy and paste your blue jelly fish as a new animation
go to effects insert image effects/rotating colors with these settings
start with animated frame ,animated length 1.7sec/frames per sec 9/ rotating colors
hit ok.
go to effects insert image effects/rotating colors with these settings
start with animated frame ,animated length 1.7sec/frames per sec 9/ rotating colors
hit ok.
do the same thing for you pink jelly fish.
just leave them there for a min.
go back to psp x out your merged layer and uncheck your mask layer, right click
copy and go back to animation shop, right click paste as a new animation.
your jelly fish animation has 16 frames so right click on the mask and hit
duplicate keep doing this until you have 16 frames of the mask.
go to the top of AS edit/select all
back to Edit/propogate paste
go back to psp x out your merged layer and uncheck your mask layer, right click
copy and go back to animation shop, right click paste as a new animation.
your jelly fish animation has 16 frames so right click on the mask and hit
duplicate keep doing this until you have 16 frames of the mask.
go to the top of AS edit/select all
back to Edit/propogate paste
now go to your pink jelly fish animation make sure it is highlighted..edit/select all
right click and copy
go back to the mask animation right click paste into selected frame..dont let go your
mouse until you have the jelly fish where you want it on your tag. and let go.
right click and copy
go back to the mask animation right click paste into selected frame..dont let go your
mouse until you have the jelly fish where you want it on your tag. and let go.
go back to paint shop pro..x out the mask layer open up your merged layer right click
copy and go back to animation shop.
paste as a new animation copy in animation shop
click back on your mask animation paste into selection, again make sure you
have everything where you want it before you let go..if you get it wrong you can
always go back and redo it.
copy and go back to animation shop.
paste as a new animation copy in animation shop
click back on your mask animation paste into selection, again make sure you
have everything where you want it before you let go..if you get it wrong you can
always go back and redo it.
now view animation and if you like what you see then you can save your animation.
(NOTE: I like to add my name now you can go to psp on your tag add your name
to the tag.copy just the name paste as a new animation in animation shop. copy
paste into selection on your tag. this way you can undo after you save and add someone
elses name)
to the tag.copy just the name paste as a new animation in animation shop. copy
paste into selection on your tag. this way you can undo after you save and add someone
elses name)
hope you enjoyed this tutorial would love to see what you do :)
Subscribe to:
Posts
(Atom)