About Me
Hello, This is Reina
I go by the name LadyQueen
psp is my hobby and passion, I love to create.
thanks for stopping by
CT Tags -Tuts and Snag Tags
This blog was originally for my tutorials..I have stopped writting tutorials for a while, but my old tuts are still here.. This is where i will share allmy CT tags and Snags that you are welcomed to save to yourcomputer and use them in your groups.Please do not rip apart and please do not claim as your own. Thank you
Wednesday, June 26, 2013
10:07 AM | Edit Post
All Squared Up
tutorial written on 6/26/13
Big Thank you to Jaylyn for helping me name this. :)
Big Thank you to Jaylyn for helping me name this. :)
For this tutorial you will need
a tube of choice , I used the art work of Jennifer Janesko
you can find her tubes here.
Font of choice , I used Satisfaction
plugins-Xero/Fritillary and Alien Skins Xenofex 2/Shatter
psp 9 or any version should work and Animation shop.
a tube of choice , I used the art work of Jennifer Janesko
you can find her tubes here.
Font of choice , I used Satisfaction
plugins-Xero/Fritillary and Alien Skins Xenofex 2/Shatter
psp 9 or any version should work and Animation shop.
Ok lets get started.
Open a new 650x250 transparent image
pick two colors from your tube.
i used #c70045 for my fg color , #f789a1 for my bg color
click on gradient and find your fg/bg colors angle 180, repeats 0
style/linear. flood fill layer 1 with your gradient.
pick two colors from your tube.
i used #c70045 for my fg color , #f789a1 for my bg color
click on gradient and find your fg/bg colors angle 180, repeats 0
style/linear. flood fill layer 1 with your gradient.
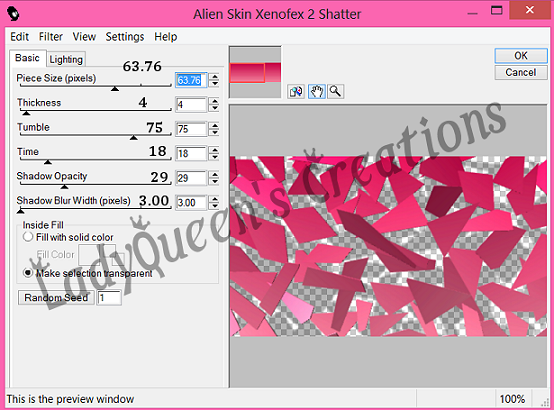
duplicate this layer , Effects/Plugins Alien Skins Xenofex 2/Shatter
with these settings.
with these settings.
then add Effects/Plugins Xero/Fritillary with these settings.
Next copy and paste your tube as a new layer
place where you want it on your tag.
now with your preset shape tool..grab the rectangle tool
keep the gradient the same in the layer palette.
draw out a rectangle. convert to raster layer, duplicate this layer, image
flip and move up just a little over the first rectangle. duplicate this layer and move it
down under the first rectangle layer. See my tag for placement.
keep the gradient the same in the layer palette.
draw out a rectangle. convert to raster layer, duplicate this layer, image
flip and move up just a little over the first rectangle. duplicate this layer and move it
down under the first rectangle layer. See my tag for placement.
add a drop shadow Vertical=2/Horizonal=1/Opacity 71/Blur 9.00
or one of your choice.
or one of your choice.
X out your bg layer and your tube layer and merge your 3 rectangle layers together.
go back to layer 1 selections/select all/float/defloat, Selections/Modify/Contract by 4
Selections/Invert , add a new raster layer and flood fill with a color from your tube.
(I used #c70045)
Selections/Select None. Bring this layer to the top.
add a drop shadow Vertical=2/Horizonal=-1/Opacity 71/Blur 9.00
Selections/Invert , add a new raster layer and flood fill with a color from your tube.
(I used #c70045)
Selections/Select None. Bring this layer to the top.
add a drop shadow Vertical=2/Horizonal=-1/Opacity 71/Blur 9.00
go back to your rectangle layer duplicate twice for a total of 3 layers.
on the first layer add the xero fritillary with the same settings as before.
on the copy of this layer add the xero fritillary with the same settings just change
the variation to 7 and then on the 3rd copy change the variation to 9
on the first layer add the xero fritillary with the same settings as before.
on the copy of this layer add the xero fritillary with the same settings just change
the variation to 7 and then on the 3rd copy change the variation to 9
at this time you can go ahead and add your cr info license number if need be and your name
unless you wait til the end like i do.
unless you wait til the end like i do.
Ok Time to animate.
X out the 2 copies of your rectangle layer right click in the layer palette copy merged.
and go over to animation shop. paste as a new layer.
go back to psp x out rectangle layer 1 un X the first duplicated layer. right click copy
merged. go over to animation shop Click inside the first frame paste after current frame.
repeat these steps for the last layer in psp and animation shop.
view your animation and if your happy you can save your new tag.
Hope you enjoyed this tutorial :)
Here is another example or the tag.
Here is another example or the tag.
Labels:PTU animated tutorials
Subscribe to:
Post Comments
(Atom)
Categories
- **CT Bella Caribena**
- Animated PTU tutorial
- Animation settings tutorial
- CT KZ Designz
- CT Kiya Designs
- CT Kloe and Elegancefly
- CT Savage Dezines
- CT for Katharine Art
- CT tutorials
- Ct Elegancefly and Savage Dezines
- Elegancefly
- PTU animated tutorials
- PTU kits
- PTU non animated
- Savage Dezines CT
- Snag tags
- Snags
- animated tutorials
- ptu tube free kit


0 comments:
Post a Comment