Grab My Blinkie

I CT For


Wednesday, July 23, 2014
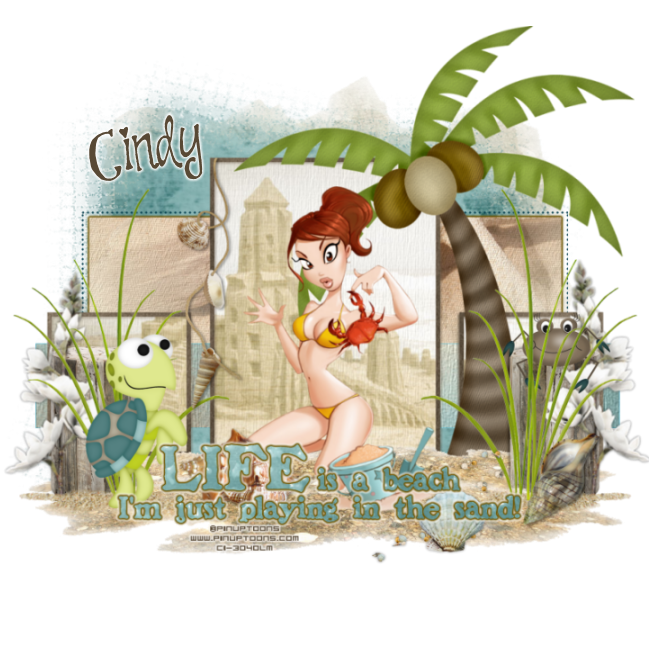
Playing in the sand
tutorial written on 7/23/14
tutorial written on 7/23/14
supplies needed:
paint shop pro any version should do
Sand Castle scrapkit by Scrapping with lil ole me you can purchase the kit
paint shop pro any version should do
Sand Castle scrapkit by Scrapping with lil ole me you can purchase the kit
you can get it on here blog creatingg with Millie HERE
tube im using a pinup tube you can purchase this at CDO
tube im using a pinup tube you can purchase this at CDO
must purchase and have license to use this tube.
eye candy/waterdrops & gradient glow
eye candy/waterdrops & gradient glow
Font i used SP pretty Purkey its free you can download here
_____________________________
_____________________________
ok lets get started
open up template 001cwm, shift d to duplicate, close out original.
delete copyright layer
image/ canvas size/ width 800 height 750 we can resize the tag later.
select layer 6 of the temp, select all/float/defloat and paste paper 26 as
a new layer, resize by 80% duplicate twice for a total of 3 layers. close out the
duplicated ones, selections/invert and hit delete on keyboard.
delete original layer.
________________
a new layer, resize by 80% duplicate twice for a total of 3 layers. close out the
duplicated ones, selections/invert and hit delete on keyboard.
delete original layer.
________________
go to layer 8 the left square, Selections/select all/float/defloat move one of the duplicated papers to the top of
this layer, selections/invert hit delet on your keyboard. Select none. delete original square layer.
this layer, selections/invert hit delet on your keyboard. Select none. delete original square layer.
do the same for layer 9 moving the last duplicated paper layer to the top of it.
we are doing this so that the 1 paper is in all 3 squares lined up together.
but feel free to use different papers how ever you like.
_____________________
we are doing this so that the 1 paper is in all 3 squares lined up together.
but feel free to use different papers how ever you like.
_____________________
go to layer 2 and merge down with layer 1, Selections/select all/float/defloat
copy paper 14 as a new layer resize by 70% and move down inside merged
layer where you want it. selections/invert hit delete on keyboard. Select none
delete original merged layer.
you can add a drop shadow or like i did and add eye candy gradient glow
color #705704
_________________________________________
go to layer select layer 5 paste paper 17 as a new layer.
selections/invert hit delte on keyboard. selections/select none.
delete original layer.
____________________________________________
selections/invert hit delte on keyboard. selections/select none.
delete original layer.
____________________________________________
k go back to the frame layer/ layer 7 copy and paste paper 2 as a new layer
and use paper 2 for the other two frames as well. layer 10 and 11.
________________________________________________
and use paper 2 for the other two frames as well. layer 10 and 11.
________________________________________________
now go to layer 12 your word art layer. select all, and paste paper
13 as a new layer. apply eye candy 4000 water drops with these settings.
delete original layer. add gradien glow with the same color as before.
and then again with a white glow.
______________________________________________
13 as a new layer. apply eye candy 4000 water drops with these settings.
delete original layer. add gradien glow with the same color as before.
and then again with a white glow.
______________________________________________
lets move down to our background layer, paste paper 10 as a new layer
resize by 80% apply wsl_mask128.
paste paper 18 as a new layer and apply wsl_mask 152.
__________________
resize by 80% apply wsl_mask128.
paste paper 18 as a new layer and apply wsl_mask 152.
__________________
copy and paste your tube as a new layer i resized mine by 80%
move under the word art layer.
element 101 (the palm tree), resize by 80% and place to the right.
paste element 37(the sand) as a new layer under your tube,
element 93 resize by 30% move to the right of the tag, duplicate
mirror.
move under the word art layer.
element 101 (the palm tree), resize by 80% and place to the right.
paste element 37(the sand) as a new layer under your tube,
element 93 resize by 30% move to the right of the tag, duplicate
mirror.
go back to the sand layer, duplicate and move above layer 93 (the piece of wood)
and mirror image. and bring down just a little under your word art layer.
add drop shadow of your choice to these two layers.
----------------------------------
see my tag for placements of elements. or go your own way its up to you :)
and mirror image. and bring down just a little under your word art layer.
add drop shadow of your choice to these two layers.
----------------------------------
see my tag for placements of elements. or go your own way its up to you :)
element 21 resize by 70% and move to the right over the wood layer there.
duplicate ,mirror
element 13(the little crab) resize by 20% and put on top of right piece of wood.
element 99, resize by 40% mirror and place to the left under the word art.
element 96 resize by 30% place under word art layer.
element 10 resize by 15% or more and place over to the right.
element 98 resize by 15% place over sand.
element 15 resize by 15%. move under word art.
element 105 resize by 50%, rotate to the left 90 degrees
use your deform tool to move it back to the right and line up with
wood , add drop shadow of choice, duplicate and mirror.
at this point some of the mask was hanging under the tag so i used
my selections tool and deleted the excess of both mask layers.
my selections tool and deleted the excess of both mask layers.
Thats it, you can now add any other elements you like, your copyright info
and name to your tag resize and save.
and name to your tag resize and save.
Hope you enjoyed my tutorial :)
Subscribe to:
Post Comments
(Atom)
0 comments:
Post a Comment