Grab My Blinkie

I CT For


Sunday, July 20, 2014
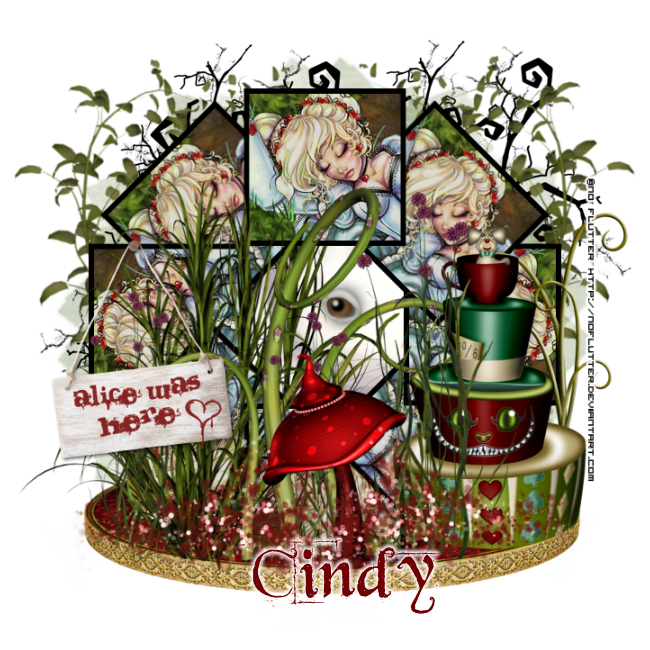
Down the Rabbit Hole
Tutorial writtne on July 20th, 2014
Tutorial writtne on July 20th, 2014
Supplies needed:
Paint shop pro
Mad about Alice scrapkit by Scrappin with Lil Ole me you can purchase this kit HERE
Mura's meister copies
font i used Beyond Wonderland you can find here at dafont
my supplies includes square shape and free tube.
you can download on box here
tube ©noflutter this is a free to use artist. feel free to use tube of your choice.
WSLmask_142 HERE
__________________
Ok lets get started shall we ?
open a new 700x700 transparent image
flood fill with white we can delete this layer later.
flood fill with white we can delete this layer later.
open up the square provided or make one of your own around the same size.
select the middle of the square with your magic want. Selections/modify/expandy
by 2. Copy and paste paper of choice, I used paper 19 and moved it over to where
the leafs are showing, copy your tube as a new layer, Selections/invert and hti delete
on both of these layers. Selections/select none. move the paper and tube layer
underneat your frame. reduce opacity to 82 % on the tube. Merge visible with these
3 layers.
-------------
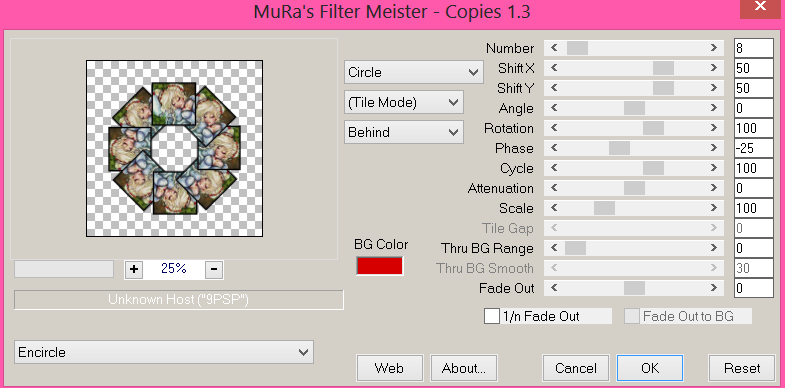
effects Mura's Meister Copies with these settings. Encircle
number change to 8
---------------------
with your magic wand click inside the middle of your shape. expand by 2 and
paste the rabbit from the kit as a new layer, no need to resize just place his eye
in the middle, Selections/invert and hit delete on your keyboard. Select none.
------------------------
add paper 8 or paper of your choice as a new layer bring to the bottom, apply WSL_mask 142
-----------------
copy and paster element 106 as a new layer resize by 70% move to the bottom
of your tag ( see my tag for placement) move under your mask layer.
-----------------------
view only the merged layer select the inside with magic wand, paste element 14
as a new layer move to the bottom over your rabbit layer, with rabbit eye still
showing a little. Selections/invert and hit
delete on the keyboard on this layer. Selections/select none.
---------------------
copy and paste this same element 14 as a new layer resize by 80% and bring
to the top and move to the left of the tag.
------------------
add element 2 as a new layer resize by 80% and move to the left a little.
----------------------
element 43 resize by 60% place on tag. Element 44 resize by 60% move to the
right of your tag.
--------------------------
paste element 72 as a new layer resize by 80% move to the bottom left of the tag
but over the mask , image/rotate to the right by 45%. move to the top (see my tag)
copy/duplicate image/mirror and place to the right of the tag.
------------------
element 54 resize by 50% move behind element 44.
----------
element 11 resize by 70% place on tag, I duplicated this and resized again by 70% and put
them around the other elements in the tag, you can place them where you want
them.
-------------
copy element 64 (the sign) as a new layer resize by 40% and place on tag. add
a drop shadown color black. verticle and horizonal 2/opacity 57, blur 5.
---------------
element 101 resize by 70% place under all layers. duplicate/mirror.
element 100 resize by 70% place to the right of tag over all the elements.
duplicate/mirror , merge these two layers, and use your eraser tool to
erase any hanging over the gold part of stand at the bottom. hope that makes sense.
---------
Ok we are finished, X out your background layer, merge all other layers together.
resize if need be and add your copyright and your name. and Save.
select the middle of the square with your magic want. Selections/modify/expandy
by 2. Copy and paste paper of choice, I used paper 19 and moved it over to where
the leafs are showing, copy your tube as a new layer, Selections/invert and hti delete
on both of these layers. Selections/select none. move the paper and tube layer
underneat your frame. reduce opacity to 82 % on the tube. Merge visible with these
3 layers.
-------------
effects Mura's Meister Copies with these settings. Encircle
number change to 8
---------------------
with your magic wand click inside the middle of your shape. expand by 2 and
paste the rabbit from the kit as a new layer, no need to resize just place his eye
in the middle, Selections/invert and hit delete on your keyboard. Select none.
------------------------
add paper 8 or paper of your choice as a new layer bring to the bottom, apply WSL_mask 142
-----------------
copy and paster element 106 as a new layer resize by 70% move to the bottom
of your tag ( see my tag for placement) move under your mask layer.
-----------------------
view only the merged layer select the inside with magic wand, paste element 14
as a new layer move to the bottom over your rabbit layer, with rabbit eye still
showing a little. Selections/invert and hit
delete on the keyboard on this layer. Selections/select none.
---------------------
copy and paste this same element 14 as a new layer resize by 80% and bring
to the top and move to the left of the tag.
------------------
add element 2 as a new layer resize by 80% and move to the left a little.
----------------------
element 43 resize by 60% place on tag. Element 44 resize by 60% move to the
right of your tag.
--------------------------
paste element 72 as a new layer resize by 80% move to the bottom left of the tag
but over the mask , image/rotate to the right by 45%. move to the top (see my tag)
copy/duplicate image/mirror and place to the right of the tag.
------------------
element 54 resize by 50% move behind element 44.
----------
element 11 resize by 70% place on tag, I duplicated this and resized again by 70% and put
them around the other elements in the tag, you can place them where you want
them.
-------------
copy element 64 (the sign) as a new layer resize by 40% and place on tag. add
a drop shadown color black. verticle and horizonal 2/opacity 57, blur 5.
---------------
element 101 resize by 70% place under all layers. duplicate/mirror.
element 100 resize by 70% place to the right of tag over all the elements.
duplicate/mirror , merge these two layers, and use your eraser tool to
erase any hanging over the gold part of stand at the bottom. hope that makes sense.
---------
Ok we are finished, X out your background layer, merge all other layers together.
resize if need be and add your copyright and your name. and Save.
Thank you for trying to my tutorial.
Subscribe to:
Post Comments
(Atom)
0 comments:
Post a Comment